顯示具有 Ubuntu 標籤的文章。 顯示所有文章

2018年8月16日 星期四

[Ubuntu] 解决 E: Sub-process /usr/bin/dpkg returned an error code (1)

#mv /var/lib/dpkg/info /var/lib/dpkg/info_old
#mkdir /var/lib/dpkg/info
#apt-get update && apt-get -f install
#mv /var/lib/dpkg/info_old/* /var/lib/dpkg/info

2018年3月1日 星期四

[Linux] 重建SSH服務器 Key

方法如下:

  • 刪除ssh_host_*
    #rm -rf /etc/ssh/ssh_host*
  • 重建ssh_host_key*
    #dpkg-reconfigure openssh-server
  • 重啟SSH Server
    #/etc/init.d/ssh restart

Reference:
[1] 重新生成SSH服务器端密钥方法

2016年10月11日 星期二

[Ubuntu] Ubuntu中QtCreator 使用搜狗輸入法

  • 安装
    #apt-get install sogoupinyin fcitx-frontend-qt5  fcitx-libs-dev
    #dpkg -i sogoupinyin_2.1.0.0082_amd64.deb
  • 重新編譯 fcitx-qt5
    #apt-get install cmake
    #export PATH="/opt/Qt5.7.1/5.7/gcc_64/bin":$PATH
    #git clone https://github.com/fcitx/fcitx-qt5
    #cd fcitx-qt5
    #make
    #cp ./platforminputcontext/libfcitxplatforminputcontextplugin.so /opt/Qt5.7.0/Tools/QtCreator/lib/Qt/plugins/platforminputcontexts
  • 錯誤處理
    • ECMConfig.cmake
      #apt install extra-cmake-modules
    • Failed to find "GL/gl.h" in "/usr/include/libdrm
      #apt-get install libgl1-mesa-dev libglu1-mesa-dev
    • Could NOT find XKBCommon
      # apt-get install libxcb-xkb-dev
      #wget http://xkbcommon.org/download/libxkbcommon-0.5.0.tar.xz
      #tar -xvf libxkbcommon-0.5.0.tar.xz
      #cd libxkbcommon-0.5.0
      #./configure
      #make
      #make install
    • package ‘fcitx-utils’ not found
      #apt-get install fcitx-libs-dev
Reference
[1]http://www.codes51.com/article/detail_1465512_6.html

2016年8月28日 星期日

[Ubuntu] Ubuntu 16.04 Server 安裝 desktop

1. 安装 Desktop
#apt-get install xorg lxde-core lterminal

2. 安装字形
#apt-get install xfonts-wqy xfonts-intl-chinese  xfonts-wqy

3. 安装HostOS与GuestOS 复制贴上
#apt-get install open-vm-tools-desktop

2016年7月22日 星期五

[Ubuntu] 將Ubuntu 15.04的網卡(eno1677XXX) 修改回eth0


  • 修改grub
  • #vim /etc/default/grub
    GRUB_CMDLINE_LINUX=""
    change to
    GRUB_CMDLINE_LINUX="net.ifnames=0 biosdevname=0"

  • 更新grub
  • #grub-mkconfig -o /boot/grub/grub.cfg

  • 修改interface
  • #vim /etc/network/interface
    auto enoXXXXX
    iface enoXXXX inet static

    auto eth0
    iface eth0 inet static


Reference:
[1] Change default network name (ens33) to old “eth0” on Ubuntu 16.04

2016年6月26日 星期日

[Linux] 常用來監控系統的相關指令


  • top / htop
    description : 列出Procces/CPU/Memory的使用率
    show items : CPU usage, Memory usage, Swap Memory, Cache Size, Buffer Size, Process PID, User, Commands
  • vmstat
    //description : Virtual Memory Statistics
    //show items : virtual memory, kernerl threads, disks, system processes, I/O blocks, interrupts, CPU activity
  • lsof
    //description : 可列出Process所使用的的檔案(fd)
    //show items : disk files, network sockets, pipes, devices and processes
  • iotop
    //description : 列出Process對IO使用狀態 //show items : DISK READ, DISK WRITE, SWAPIN
  • iostat
    //description : 列出每顆Disk的IO使用狀態 //show items : tps, read/s, write/s, read, write
  • iftop
    //description : 列出所有session的網路使用率 //show items : src ip , dst ip , rate( 2s 10s 40s 的平均值 )


Reference:
[1] 20 Command Line Tools to Monitor Linux Performance

2016年6月23日 星期四

[Linux] Monitor Linux系統的各種資源狀態


  • 計算網路卡的流量
    #cat /sys/class/net/$nic_dev/statistics/$file

    $file :
    rx_bytes : 目前已接收的bytes
    tx_bytes : 目前已傳輸的bytes
    rx_packets : 目前已接收的packets
    tx_packets : 目前已傳輸的packets

  • 計算網路卡的流量 - Script
    #!/bin/sh

    INTERVAL=1

    nic=$1

    while true
    do
        R1=`cat /sys/class/net/$nic/statistics/rx_bytes`
        T1=`cat /sys/class/net/$nic/statistics/tx_bytes`
        sleep $INTERVAL
        R2=`cat /sys/class/net/$nic/statistics/rx_bytes`
        T2=`cat /sys/class/net/$nic/statistics/tx_bytes`

        RKBPS=$((($R2 - $R1) / 1024))
        TKBPS=$((($T2 - $T1) / 1024))

        echo "TX $nic: $TKBPS kB/s RX $nic: $RKBPS kB/s"
     
    done

  • 計算IO的讀寫量
    #cat /proc/PID/io

    欄位:
    rchar: number of bytes the process read, using any read-like system call (from files, pipes, tty...).
    wchar: number of bytes the process wrote using any write-like system call.
    syscr: number of read-like system call invocations that the process performed.
    syscr: number of write-like system call invocations that the process performed.
    read_bytes: number of bytes the process directly read from disk.
    write_bytes: number of bytes the process originally dirtied in the page-cache (assuming they will go to disk later).
    cancelled_write_bytes: number of bytes the process "un-dirtied" - e.g. using an "ftruncate" call that truncated pages from the page-cache.

2016年6月15日 星期三

[Ubuntu] KVM啟用SR-IOV功能

Virtual Function I/O - VFIO 

Single Root I/O Virtualization (SR-IOV)


  • 確認網卡支援SR-IOV
    //選擇要確認的網卡
    #lspci
    ...(省略)
    05:00.0 Ethernet controller: Intel Corporation Ethernet Controller 10-Gigabit X540-AT2 (rev 01)
    ...(省略)

    #lspci -s 05:00.0 -vvv | grep "Single Root I/O Virtualization"

  • 啟動IOMMU
    //編輯 grub (vim /etc/default/grub)

    //Intel CPU
    GRUB_CMDLINE_LINUX_DEFAULT="intel_iommu=on"

    //AMD CPU
    GRUB_CMDLINE_LINUX_DEFAULT="amd_iommu=on"
    #update-grub

    //啟動匯入
    //編輯 ixgbe.conf(/etc/modprobe.d/ixgbe.conf)
    #

  • 匯入Driver
    //匯入vxlan
    #modprobe vxlan

    //匯入pci-stub
    #modprobe pci_stub

    // 啟動Virtual Function
    // 方法一:
    // 匯入1G的ko檔,開啟Function。成功開啟後可從ip a看到新的網卡。
    #modprobe -r ixgbe // 移除ixgbe
    #modprobe ixgbe max_vfs=<int> //啟動Virtual Functions功能,<int>根據網卡而定。

    //匯入10G的ko檔,開啟Function。成功開啟後可從ip a看到新的網卡。
    #modprobe -r igb // 移除ixgbe
    #modprobe igb max_vfs=<int> //啟動Virtual Functions功能,<int>根據網卡而定。

    // 方法二:
    // 取得該張網卡可使用的最大VFS
    // 指令:
    #cat /sys/bus/pci/devices/<DOMAIN:BUS:DEVICE.FUNCTION>/sriov_totalvfs
    Ex:
    #cat /sys/bus/pci/devices/0000\:01\:00.0/sriov_totalvfs
    
    
    取得 01\:00.0 方式:
    #lspci
    
    顯示:
    ...(省略)
    
    01:00.0 Ethernet controller: Intel Corporation I350 Gigabit Network Connection (rev 01)
    
    ...(省略)
    
    // 指定對某實體開啟VF
    // 指令:
    #echo 8 > /sys/bus/pci/devices/<DOMAIN:BUS:DEVICE.FUNCTION>/sriov_numvfs
    
    
    Ex:
    #echo 8 > /sys/bus/pci/devices/0000\:01\:00.0/sriov_numvfs


  • 初始化PCI相關設定
    //本機器共有兩張支援SR-IOV功能的網卡,假設使用第二張網卡做為本次實驗。
    #lspci | grep "Virtual Function"

    顯示:
    ...(省略)

    01:00.0 Ethernet controller: Intel Corporation I350 Gigabit Network Connection (rev 01)
    01:00.1 Ethernet controller: Intel Corporation I350 Gigabit Network Connection (rev 01)
    01:10.0 Ethernet controller: Intel Corporation I350 Ethernet Controller Virtual Function (rev 01)
    01:10.1 Ethernet controller: Intel Corporation I350 Ethernet Controller Virtual Function (rev 01)
    ...(省略)
    取得 01:10.1,再取的 vendor和device ID
    #lspci -s 01:10.1 -n

    顯示:
    01:10.3 0200: 8086:1520 (rev 01)

  • 匯入至 pci-stub
    echo "8086 1520" > /sys/bus/pci/drivers/pci-stub/new_id
    echo "0000:01:10.1" > /sys/bus/pci/drivers/igbvf/unbind
    echo "0000:01:10.1" > /sys/bus/pci/drivers/pci-stub/bind

    若要取消功能則執行

    echo "8086 1520" > /sys/bus/pci/drivers/pci-stub/remove_id

  • 啟動KVM
    #brctl addbr br0
    #tunctl -t tap0

    #qemu-system-x86_64 test.img --enable-kvm -netdev tap,id=hostnet0,ifname=vnet0,script=/etc/qemu-ifup -device pci-assign,host=01:10.1 -vnc :0,password -k en-us -monitor stdio

    Note :
    /etc/qemu-ifup的功能是綁定default gw的那張網卡,若不是要綁定那張網卡,需修改該script

  • 指定某個Virtual Function tagged vlan
    //假設 eth0是Physical function,並且 virtual function 1 tagged vlan 2
    //指令:
    #ip link set <pf> vf <vf_index> vlan <vlan id>  qos <pirority> mac  <macaddr>

    #ip link set eth0 down
    #ip link set eth0 vf 1 vlan 2
    #ip link set eth0 up

    //顯示vf狀態 #ip link show dev eth0

    顯示:
    link/ether a0:36:9f:41:8b:e3 brd ff:ff:ff:ff:ff:ff
      vf 0 MAC 9e:21:26:cb:dc:47, vlan 2, spoof checking on, link-state auto
      vf 1 MAC 5e:8c:75:69:c3:19, spoof checking on, link-state auto
      vf 2 MAC 00:00:00:00:00:00, spoof checking on, link-state auto ...(省略)

    //啟動KVM,假設virtual function 1 , host=01:10.3
    # qemu-system-x86_64 test.img --enable-kvm -netdev tap,id=hostnet0,script=/etc/qemu-ifup -device pci-assign,host=01:10.3 -vnc :0,1qazxcvb -k en-us -monitor stdio

Reference: 
[1] 英特爾的VT-x、VT-d、VT-c技術概述
[2] KVM 介绍(4):I/O 设备直接分配和 SR-IOV [KVM PCI/PCIe Pass-Through SR-IOV]
[3] SR-IOV Mode Utilization in a DPDK Environment
[4] PCI_EXPRESS_PASSTHROUGHb
[5] HowTo Set Virtual Network Attributes on a Virtual Function (SR-IOV)

[Ubuntu] There was a problem reading data from the CD-ROM. Please make sure it is in the drive. If retrying does not work, you should check the integrity of your CD-ROM. Failed to copy file from CD-ROM. Retry?

今天使用usb安裝 Ubuntu 14.04到Server一直失敗,且安裝過程一直出現這個錯誤訊息

There was a problem reading data from the CD-ROM. Please make sure it is in the drive. If retrying does not work, you should check the integrity of your CD-ROM.  Failed to copy file from CD-ROM. Retry?

後來發現是 unetbootin搞的鬼,不知道它中間做了什麼事?故只要改用linux dd即可解決該問題。

指令:
dd if=ubuntu-14.04-server-amd64.iso of=/dev/sdb bs=16M

2016年6月2日 星期四

[Ubuntu] KVM+QEMU 使用筆記 (Ubuntu 14.04)

  • 安裝指令
    #apt-get install qemu-kvm qemu-system libvirt-bin bridge-utils

  • 建立Image檔
    qemu-img

    check[-q] [-f fmt] [--output=ofmt] [-r [leaks | all]] filename

    create
    [-q] [-f fmt] [-o options] filename [size]

    commit [-q] [-f fmt] [-t cache] filename

    compare [-f fmt] [-F fmt] [-p] [-q] [-s] filename1 filename2

    convert [-c] [-p] [-q] [-n] [-f fmt] [-t cache] [-O output_fmt] [-o options] [-s snapshot_id_or_name] [-l snapshot_param] [-S sparse_size] filename [filename2 [...]] output_filename

    info [-f fmt] [--output=ofmt] [--backing-chain] filename

    map [-f fmt] [--output=ofmt] filename

    snapshot [-q] [-l | -a snapshot | -c snapshot | -d snapshot] filename

    rebase [-q] [-f fmt] [-t cache] [-p] [-u] -b backing_file [-F backing_fmt] filename

    resize [-q] filename [+ | -]size

    amend [-q] [-f fmt] -o options filename

    [-f fmt] : raw|qcow2|qcow|vmk|cloop

    Example:
    qemu-img create -f qcow2 linux.img 5G

  • Create Virtual Machine
    qemu-system-{cpu-architecute} [--enable-kvm]  [-smp options] [-boot dev] [-m size] [-cdrom iso] [-soundhw sdev] [-net nic] [-vnc conn] [-k keyboard] [-netdev options] [disk options] [-monitor options] [--enable-kvm]

    [--enable-kvm] : 啟動KVM能力,該功能CPU必須支援
        1. #egrep 'vmx|svm' /proc/cpuinfo

    [--smp options] :
        1. -smp [current allocation] [,maxcpus=n] [,sockets=n] [,cores=n] [,threads=n]     ( Example : -smp 2,maxcpus=4,sockets=4,cores=2,threads=2 )

    [-boot dev] : a, b (floppy 1 and 2), c (first hard disk), d (first CD-ROM), n-p (Etherboot from network adapter 1-4)

    [-m size] : memory size , default M

    [-cdrom iso] : 加入 cdrom

    [-soundhw sdev] : 加入 sound card

    [-vnc conn] :
        1. conn = host:port,password
        2. conn = host:port,tls,x509=/path
        3. conn = host:port,tls,x509verify=/path

    [-k keyboard]  keyboard layout

    [-netdev options]    
        1. -netdev nic [,vlan=n] [,macaddr=mac] [,model=type] [,name=name] [,addr=addr]
        2. -netdev tap [,vlan=n][,name=name][,fd=h][,ifname=name][,script=file][,downscript=dfile][,helper=helper]
        3. -netdev bridge ,id=id[,br=bridge][,helper=helper] -net bridge[,vlan=n][,name=name][,br=bridge][,helper=helper]
        4. -netdev vhost-user,chardev=id[,vhostforce=on|off][,queues=n]
        5. -netdev none
     
    [nic] : 建立一個網路卡,並且連接至VLAN n ( n預設為0 )
    [tap] : 連接到host TAP的網路介面
    [bridge] : Bridge 模式,
    [vhost-user]
    [type] : [virtio|i82551|i82557b|i82559er|ne2k_pci|ne2k_isa|pcnet|rtl8139|e1000| smc91c111|lance|mcf_fec]

    [disk options] :
        1. -drive file=[path] ,if=none [,id=id_name] [,format=qow2] -device virtio-blk-pci,drive-virtio-disk0,id=virtio-disk0 [,bootindex=1]
        ( Example : -drive file=/images/ubuntu-14.04.img,if=none,id=drive-virtio-disk0,format=qcow2 -device virtio-blk-pci,drive=drive-virtio-disk0,id=virtio-disk-0,bootindex=1 )


    [-monitor options] :
        1. -monitor stdio
        2. -monitor telnet:[bind_ip]:[port] [,server] [,nowait] [,nodelay]
        ( Example : -monitor telnet::7000, server, nowait, nodelay )
       
    Example 1 : (安裝 Guest OS )
    qemu-system-x86_64 --enable-kvm -smp 2,maxcpus=4,sockets=4,cores=2,threads=2 linux.img -cdrom ubuntu-14.04-server-amd64.iso -boot d -vnc :0,password -k en-us -netdev nic -monitor stdio


  • Virtual Machine相關指令
    #telnet  host  port

    // 暫停/恢復/重置
    (qemu) stop  #暫停VM
    (qemu) cont #恢復VM
    (qemu) system_reset #重新啟動 VM
    (qemu) system_poweddown  #送ACPI Shutdown request
    (qemu) quit #關閉

    // Memory 相關
    (qemu) memsave    #儲存 Virutal memory 資料
    (qemu) pmemsave    #儲存 Physical memory 資料

    // Snapshot 相關
    (qemu) savevm name    #建立Snapshot
    (qemu) loadvm name    #恢復Snapshot
    (qemu) delvm    #刪除Snapshot
    (qemu) info snapshot    #顯示可用的Snapshot

  • NAT網路設定
    //-------Host OS 設定-------
    //安裝 tap tool

    #apt-get install uml-utilities

    //KVM Command
    #qemu-system-x86_64 linux.img --enable-kvm -vnc :0,password -k en-us -netdev nic -monitor stdio

    // 建立通道
    #tunctl -t tap0

    // 設定iptables
    #echo 1 > /proc/sys/net/ipv4/ip_forward
    #iptables -t nat -A POSTROUTING -o eth0 -j MASQUERADE
    #iptables -I FORWARD 1 -i tap0 -j ACCEPT
    #iptables -I FORWARD 1 -o tap0 -m state --state RELATED,ESTABLISHED -j ACCEPT

    //-------Guest OS 設定-------
    ip address : 192.168.100.2
    gateway : 192.168.100.1
    dns : 192.168.100.1

  • Bridge網路設定
    //-------Host OS 設定-------
    //安裝Bridge
    #apt-get install bridge-utils

    //建立Bridge
    #brctl addbr br0
    #brctl addif br0 eth0

    //KVM Command
    #qemu-system-x86_64 linux.img --enable-kvm -netdev tap,id=hostnet0,ifname=vnet0,script=/etc/qemu-ifup -device virtio-net-pci,netdev=hostnet0,id=net0 -vnc :0,password -k en-us -monitor stdio

  • 設定VLAN(802.1Q)
    VLAN示意圖
    要對某VM送出或進來的封包執行802.1Q,方法很簡單,只需要將VLAN和VNet0以起綁定至br0.2即可,如VLAN示意圖所示。

    //安裝vlan tools
    #apt-get install vlan

    //設定VLAN,假設VLAN為2
    #vconfig add eth0 2

    //建立新的Bridge,並且綁定eth0.2
    #brctl addbr br0.2
    #brctl addif br0.2 eth0.2

    //修改 /etc/qemu-ifup
    switch=br0.2
    for br in $switch; do
      if [ -d /sys/class/net/$br/bridge/. ];then
        brctl addif $br vnet0
      fi
    done

    //KVM Command
    #qemu-system-x86_64 linux.img --enable-kvm -netdev tap,id=hostnet0,ifname=vnet0,script=/etc/qemu-ifup -device virtio-net-pci,netdev=hostnet0,id=net0 -vnc :0,password -k en-us -monitor stdio


Reference:
[1] 架設Linux KVM虛擬化主機 (Set up Linux KVM virtualization host)
[2] QEMU Emulator User Documentation
[3] Chapter 14. Administrating Virtual Machines with QEMU Monitor
[4] 使用 monitor command 监控 QEMU 运行状态 
[5] Setting up QEMU with a NAT
[6] CentOS + KVM 建立 VLAN 的方式
[7]  KVM虚拟化技术之使用Qemu-kvm创建和管理虚拟机

2016年5月17日 星期二

[Ubuntu] Ubuntu14.04 安裝 Java + Tomcat + Mysql

安裝步驟
  • 安裝Java
  • #apt-get install openjdk-7-jdk

  • 安裝Tomcat
  • #apt-get install tomcat7

  • 安裝Mysql
  • #apt-get install mysql-server libmysql-java

  • tomcat7設定檔
  • #vim /etc/default/tomcat7
    JAVA_OPTS="-Djava.security.egd=file:/dev/./urandom -Djava.awt.headless=true -Xmx512m -XX:MaxPermSize=256m -XX:+UseConcMarkSweepGC"

  • 預設Tomcat開啟的Port 8080,若想改接收Port 80,可加入以下iptables command
  • #iptables -t nat -A PREROUTING -p tcp --dport 80 -j REDIRECT --to-port 8080

Reference :
[1] How To Install Apache Tomcat 7 on Ubuntu 14.04 via Apt-Get

[Ubuntu] Linux 指令筆記


  • 將使用者加入Sudoer檔
  • #sudo adduser sudo

  • 使用指定的使用者執行程式
  • #su -c '${program_name}' ${username}
    example:
    #su -c 'php test.php' www-data

  • 針對某Program發Signal
  • #ps -aux | grep ${program_name} | grep "grep" -v | awk '{print $2}' | xargs kill -${signal_num}
    example:
    #ps -aux | grep test.php | grep "grep" -v | awk '{print $2}' | xargs kill -15

  • 找尋大於某Size的檔案
  • #find . -type f -size -4096c
    Parameter:
    `b' for 512-byte blocks (this is the default if no suffix is used)
    `c' for bytes
    `w' for two-byte words
    `k' for Kilobytes (units of 1024 bytes)
    `M' for Megabytes (units of 1048576 bytes)
    `G' for Gigabytes (units of 1073741824 bytes)

  • 查詢硬體與系統設定的關係
    #lshw

    // 查詢網路卡
    #lshw -class network

2016年3月8日 星期二

[STM32] 如何取到STM32 MCU的Serial ID


unsigned int serial_id[3];

serial_id[0] = *((unsigned int *)0x1FFFF7E8));
serial_id[1] = *((unsigned int *)0x1FFFF7EC));
serial_id[2] = *((unsigned int *)0x1FFFF7F0));

Reference:
[1] http://www.keil.com/forum/58081/read-unique-id/

2016年3月7日 星期一

[Network] Routing Table其實不只一個

    最近設計的一套系統,有兩張網卡A、B。而由於使用者的環境因素導致我的Routing Rule不論怎麼設定,封包可能從網卡A進來,但卻從網卡B進到另一個網段,而導致封包回不來之窘境。


這個問題卡好久啊,總算找到解法了。概念其實很簡單,從A網卡進來的封包就走A網卡的Routing Table,而從B網卡進來的封包就走B網卡的Routing Table。而實作方式使用 iproute2。(Ubuntu Linux預設就有這個套件)

以下範例則是參考[1]。假設兩線路ADSL和Cable,希望從ADSL進來的封包就從ADSL的路徑回去,反之一樣,從Cable進來的封包則從Cable回去。

網路環境設定如下:
eth1 192.168.100.50 Gateway 192.168.100.254 --> ADSL
eth2 192.168.200.100 Gateway 192.168.200.254 --> CABLE

設定方式:
  1. 新增 Table
    #vim /etc/iproute2/rt_tables
    1    ADSL
    2    Cable

  2. 各至設定routing rule
    // 設定ADSL Routing Table
    #ip route add 192.168.100.0/24 dev eth1 src 192.168.100.50 table ADSL
    #ip route add default via 192.168.100.254 table ADSL

    // 設定CABLE Routing Table
    #ip route add 192.168.100.0/24 dev eth1 src 192.168.100.50 table CABLE
    #ip route add default via 192.168.100.254 table CABLE

    // 指定從哪張網卡來的封包走哪個Routing Table
    #ip rule add from 192.168.100.50 table ADSL
    #ip rule add from 192.168.200.100 table CABLE


    // Delete routing rule
    #ip rule del from 192.168.100.50 table ADSL
    #ip rule del from 192.168.200.100 table CABLE

    // Show routing by table
    #ip rule show table ADSL
    #ip rule show table CABLE


Reference :
[1] LINUX上的雙網路共享

2016年3月2日 星期三

[Linux] Parser JSON Parser For Linux Command-Line

jq command是一個command-line的processor。

Ubuntu安裝方式如下:

#apt-get install jq

使用方法:

  • 取得物件裡的值,Ex1 : {"obj":1, "desc": "object1", "inobj":{"desc":"in-object1"}}
    //取得obj
    #jq '.obj'
    =>1

    //取得obj1
    #jq '.obj1'
    =>null

    //取得inobj1.desc
    #jq '.inobj.desc'
    =>in-object1

    //取得key
    #jq 'keys'
    =>["obj","desc","inobj"]


  • 取得陣列,Ex2 : [{"obj":1, "desc": "object1"},{"obj":2, "desc": "object2"},{"obj":3, "desc": "object3"}]
    // 取得第一個物件.[0]
    #jq '.[0]'
    =>{"obj":1, "desc": "object1"}

    // 取得所有物件.[]
    #jq '.[]'
    =>{"obj":1, "desc": "object1"},{"obj":2, "desc": "object2"},{"obj":3, "desc": "object3"}

    // 取得1~2物件.[1:2]
    #jq '.[1:2]'
    =>{"obj":2, "desc": "object2"},{"obj":3, "desc": "object3"}


Reference:
[1] https://stedolan.github.io/jq
[2] #man jq

2015年11月24日 星期二

[Python] 在Ubuntu 14.04,使用Python撰寫MySql程式


  • 安裝Python 套件
  • #apt-get install python-mysqldb

  • Sample Code
  • import MySQLdb

    try :
        db = MySQLdb.connect("host", "username", "password", "db_name", charset='utf-8')

        sql = "SELECT field1, field2 FROM table"
        cursor = db.cursor()
        cursor.execute(sql)

        results = cursor.fetchall()
        for record in results:
           col1 = record[0]
           col2 = record[1]
           print "%s, %s" % (col1, col2)

        db.close()
    except MySQLdb.Error as e:
        print "Error %d: %s" % (e.args[0], e.args[1])

Reference :
[1] 實作Python 連接MySQL 資料庫

[LDAP] 使用 LDAP 管理 Account on Ubuntu 14.04 (使用phpldapadmin)

  • 簡介
    LDAP的概念與DNS類似,都是以階層(hierarchical)概念來進行操作與處理。因此,設計一透合適的階層架構圖(Schema)是非常重要的,Schema可以讓LDAP Client知道該如何存取資訊,以及可以定義哪些人符合擁有哪些權限等等資訊。圖一為我所設計的Schema,圖中個縮寫定義如下:
    DIT(Directory Information Tree;目錄資訊樹)
    DC(Domain Country;區域網域)
    OU(Organization Unit;組織單位)
    CN(Common Name;使用者名稱)
    DN(Distinguish Name;識別名稱)
圖一 : Schema
  • 安裝LDAP和phpldapadmin
    #apt-get install slapd ldap-utils
    #apt-get install phpldapadmin apache2 php5 php5-mysql

  •  設定sldapd
    #dpkg-reconfigure slapd

     以下為我採用的設定
    • Omit OpenLDAP server configuration? No
    • DNS domain name? example.com.tw
    • Organization name? company (or example)
    • Administrator password? (phpldapadmin登入用)
    • Database backend to use? HDB
    • Remove the database when slapd is purged? Yes
    • Allow LDAPv2 protocol? No

    Note: db path : /var/lib/ladp

  •  設定 phpldapadmin
    #vim /etc/phpldapadmin/config.php
    #指定Host
    $servers->setValue('server','host','127.0.0.1');

    #指定DIT
    $servers->setValue('server','base',array('dc=example,dc=com,dc=tw'));

    #指定admin
    $servers->setValue('login','bind_id','cn=admin,dc=example,dc=com,dc=tw');

  • Connect to phpldapadmin
    • WebSite : http://127.0.0.1/phpldapadmin
    • 帳號:cn=admin,dc=example›‹,dc=com,dc=tw
    • 密碼:執行dpkg-reconfiguration時所設定的那組
    phpldapadmin

  • 安裝並設定 LDAP Client
    #apt-get install libpam-ldap nscd
    #dpkg-reconfigure ldap-auth-config
        注意:LDAP server Uniform Resource Identifier: ldap://{LDAP SERVER}
    #auth-client-config -t nss -p lac_ldap
    #pam-auth-update
  • 如果需要使用者登入時,沒有家目錄要自動建立,則設定以下動作
    #vim /etc/pam.d/common-session
    session required pam_mkhomedir.so umask=0022 skel=/etc/skel

  • 重啟Service
    /etc/init.d/nscd restart

Reference :
[1] How To Install and Configure OpenLDAP and phpLDAPadmin on an Ubuntu 14.04 Server

2015年6月24日 星期三

[Ubuntu] 安裝Redmine on Ubuntu14.04


  • 安裝Redmine依賴之相關套件
  • #apt-get install apache2 libapache2-mod-passenger mysql-server mysql-client
    設定mysql password

  • 安裝Redmine
  • #apt-get install redmine redmine-mysql
    設定Redmine (Yes)

    設定Redmine資料庫(MySql)
    設定MySql Password


  • 安裝Bundler
  • #gem install bundler

  • vim /etc/apache2/mods-available/passenger.conf  
  • 設定內容


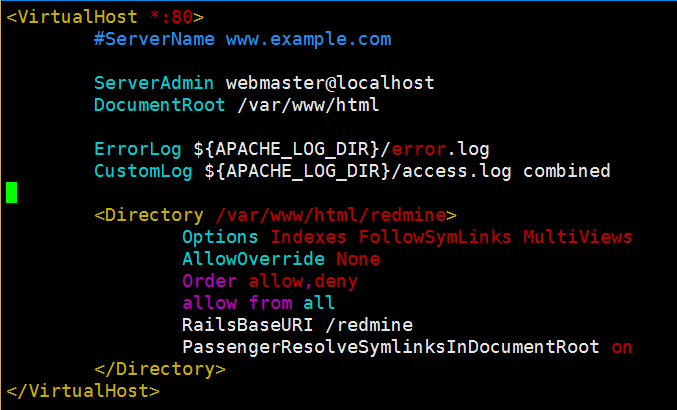
  • vim /etc/apache2/sites-available/000-default.conf
  • 設定內容


  • link redmine source code to web root
  • #ln -s /usr/share/redmine/public /var/www/html/redmine

  • 更改權限
  • #chown -R www-data:www-data /usr/share/redmine/

  • 重啟Apache
  • #/etc/init.d/apache2 restart

  • 開啟Redmine網頁
  • 帳號 : admin
    密碼:  admin

Reference :
[1] redmine
[2] installing-redmine-on-ubuntu-14-04

2015年4月21日 星期二

[Ubuntu] Ubuntu 安裝字型

常用的字型:
*中文
ttf-arphic-bkai00mp - 文鼎PL細上海宋 (AR PL Mingti2L Big5)
ttf-arphic-bsmi00lp
- 文鼎PL中楷 (AR PL KaitiM Big5)
ttf-arphic-gbsn00lp
- 文鼎PL簡報宋 (AR PL SungtiL GB)
ttf-arphic-gkai00mp
- 文鼎PL簡中楷 (AR PL KaitiM GB)
ttf-arphic-uming
- 文鼎PL上海宋Uni (AR PL ShanHeiSun Uni)
ttf-arphic-ukai
- 文鼎PL中楷Uni (AR PL ZenKai Uni)
ttf-arphic-uming - 文鼎 PL 上海宋 Uni, AR PL ShanHeiSun Uni

xfonts-intl-chinese
xfonts-intl-chinese
xfonts-wqy


*日文
ttf-vlgothic
ttf-kochi-gothic
ttf-kochi-mincho

*韓文
ttf-baekmuk
x-ttcidfont-conf


指令:
$ apt-get install ttf-arphic-bkai00mp ttf-arphic-bsmi00lp ttf-arphic-gbsn00lp ttf-arphic-gkai00mp ttf-arphic-uming ttf-arphic-ukai xfonts-intl-chinese xfonts-intl-chinese xfonts-wqy

2015年4月14日 星期二

[Ryu] unsupported version 0x1. If possible, set the switch to use one of the versions [4]

 這個錯誤的意思就是OpenFlow的版本有誤,解決方法就是要設定OVS支援OpenFlow
 
#mn --controller=remote,ip=CTR_IP --topo linear,2 --switch ovsk,protocols=OpenFlow13 
or
#ovs-vsctl set bridge s1 protocols=OpenFlow10,OpenFlow13
#ovs-vsctl set bridge s2 protocols=OpenFlow10,OpenFlow13


而如果執行 ovs-vsctl發以下訊息,那表示你的OVS版本太低了,必須更新OVS。
Bridge does not contain a column whose name matches "protocols"

更新方法:

#wget http://openvswitch.org/releases/openvswitch-2.3.1.tar.gz
#tar -zxvf openvswitch-2.3.1.tar.gz
#cd openvswitch-2.3.1
#./configure --prefix=/usr --with-linux=/lib/modules/`uname -r`/build
#make
#make install
#make modules_install
#rmmod openvswitch
#depmod -a
#/etc/init.d/openvswitch-switch restart


Reference:
[1] Upgrading Open vSwitch